Have you updated your iPhone to iOS 11? If you have, you may have already discovered an exciting new feature: recording the activity on your phone’s screen.
This is different from your basic screenshot---a still photo that displays what is on your screen at a given moment. Recording your phone’s screen creates a video that can show any and every action taken on your phone.
Have you ever struggled to help a friend or family member understand how to do something on their own mobile phone? This can be a tough challenge. While you can take screenshots and walk them through the process over the phone, having an on-screen tutorial can make all the difference. This is precisely what the new screen recording function can be used for, plus much more.
A few months ago, recording your iPhone or iPad screen was a somewhat complicated task. Hooking your device up to a Mac and recording using Quicktime was the official method of screen recording. There were also some “unofficial” apps that users could try on the device itself. But these methods were complex, and often fraught with issues. The iOS 11 update means that you can now make screen recordings right on your phone, and do so with ease.
A Step-by-Step Tutorial for Recording Your Phone Screen
Ready to start recording your phone’s screen? You can get started in just a few steps.
Step 1: Access the Recording tool
Getting the Screen Recording tool enabled is the first order of business. It’s not an app, but is part of the Control Center. To find the tool, enter your Settings app. From here, scroll down and click on “Control Center.” Next click Customize Controls.
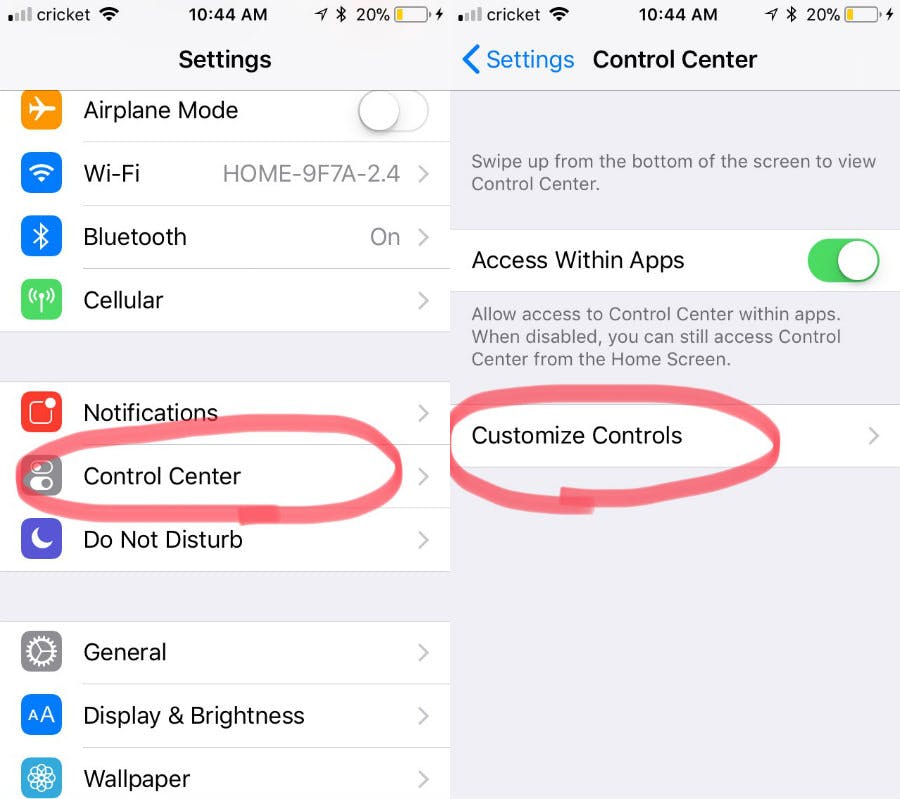
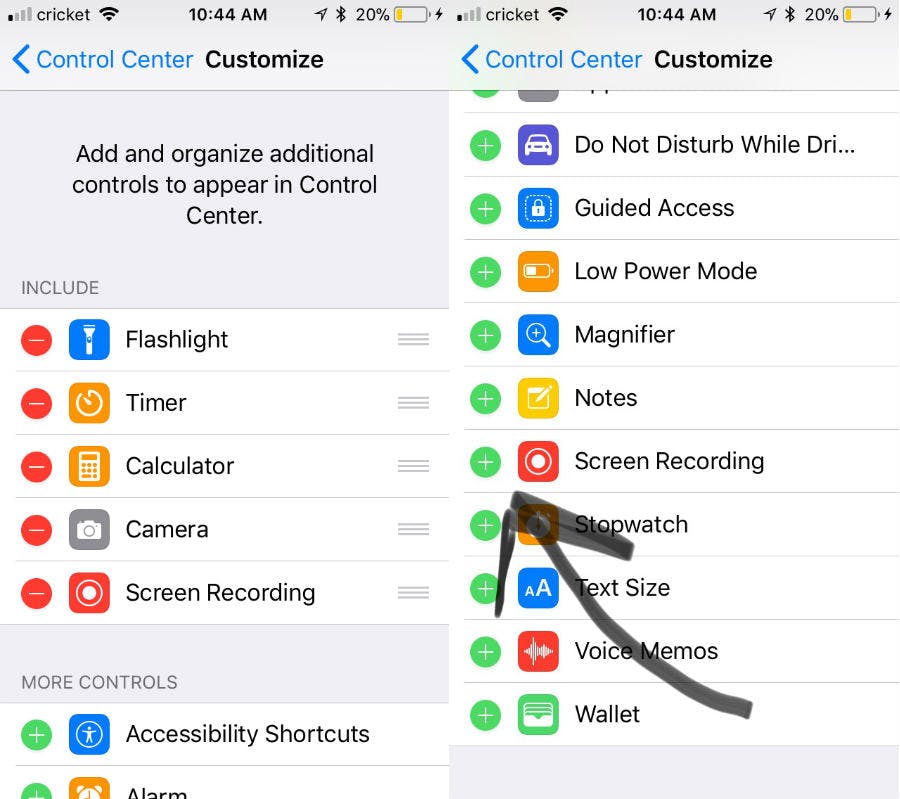
In this section, you’ll see a lot of options of apps and tools you can add to your own control center. Those which are already enabled are listed at the top with red minus sign symbols on the left. Those which can be added/enabled are down below with green plus sign symbols next to them.
Find the tool “Screen Recording.” If it has a green plus sign next to it, click the sign to enable it to your Control Center. You’ll know you’re successful if you now see “Screen Recording” in the top list with a red minus sign to its left.
Step 2: Record!
Time to practice recording!
Now let’s test drive your exciting new tool. Since you have enabled it in the Control Center, it is easy to access. Simply swipe up from the bottom of your screen and your Control Center option will display.
The Screen Recording tool is indicated by an icon (a small filled-in circle surrounded by a thin, open circle---kind of like a record button!). Tap the button to begin recording immediately, or use 3D Touch to bring up the menu. Want to record audio alongside your video? Click to select “Microphone Audio On”. Once you’ve hit the record button, a countdown of 3 begins and the recording will start.
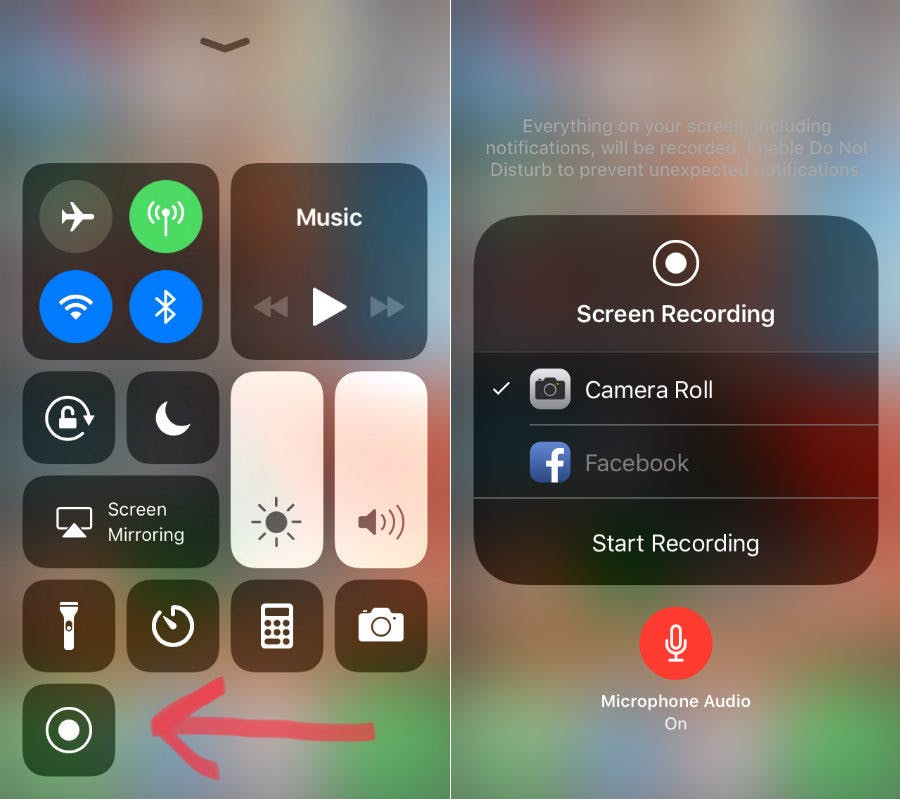
It’s time to go ahead and record your screen. As you navigate through your device, everything you do will be recorded. Want to go into an app? Change your settings? Watch a video? Whatever actions you take will be shown. That’s exactly what Screen Recording can be so helpful---particularly for step-by-step tutorials.
As you record, a red bar will appear at the top of your screen. When you’re ready to stop the recording just click the red bar. Voila! Your video will be saved to the Photos app on your phone, ready for you to share with others.
Tips for Recording Your Phone’s Screen
Making a recording is easy, but there are some best practices to follow if you want a smooth, clean video.
First, be sure to minimise interruptions. Since the recording tool will show everything that happens on your phone, a notification popping up or an incoming phone call could really wreak havoc with the flow of your video. To avoid these issues, you can turn off your notifications, put your phone on Airplane mode, or turn on ‘Do Not Disturb.’
Clean it Up
If you’re recording a screen for family and friends, you may not be overly concerned with getting things just right, but if you are creating a video for work or other professional purposes, you might want to ‘clean up’ your screen. Your basic screen recording will show your battery life, current network strength, and time. Some people may find a low battery or weak network signal to be a distracting feature of a video. If you’d like to avoid that, you can plug your device into a Mac and use Quicktime to create a Clean Status Bar. With that in effect, your battery power will display 100% and you’ll appear to have a full network signal; a nice, clean look that avoids distractions. There are also apps that can achieve this. Read more about how to do this here.
You might also opt to edit your recording slightly after it’s finished. Since recording a screen follows every action you take, it will show everything you do from the start, which may be actions that have no relevance to the video. Using basic editing you can ‘trim’ the start or end of your video to ensure you’re only showing the parts you want to share.
Ways to Use the Screen Recording Feature
Now that you know the basics of recording your phone’s screen in iOS 11, it’s time to take advantage of your newfound skills.
Tutorials may be the most obvious reason to do a screen recording. Of course, it can come in handy to assist a friend or relative with learning how to do something on his or her phone. Perhaps your Grandma often asks you how to share a photo on Facebook. You could make her a basic video with the steps; something she can refer to whenever she needs to. Are you a business owner or entrepreneur? Do you have a client who needs guidance with using one of your apps or accessing your site on mobile? You could create a super-simple tutorial to help them learn how an app works or even how to successfully browse your site or make a purchase. This makes Screen Recording an important tool for commercial purposes.
Do your kids use mobiles? It can be fun to record the screen to show off their skills or achievements in their favourite games.
Have a problem with your device or with an app? You can record a bug or software error and submit feedback to the developer. This could help promote better, faster updates for the apps and programs you use most.
There are definitely many beneficial ways to use the Screen Recording feature. Share this article with a friend who will find it useful!